Showing posts with label Vail Baby Photographer. Show all posts

Wednesday, May 10, 2017

Vail Newborn Lifestyle Photos - Brooks

When I do my newborn shoots, I take a ton of equipment with me.  I usually have to start packing the night before and I have a long check list that I follow every time, because all of the items are necessary.  

When I was asked to take newborn photos for Brooks, his Mom had asked me to do more of a casual lifestyle shoot with no props or backdrops.  I did newborn photos for his brother Ryder a couple of years ago using my normal set up and she wanted something different.  It sounds silly, but I was so excited to do a newborn shoot where I didn't have to haul half of the contents of my garage with me!

We had such a fun time shooting and I'm definitely a fan of this type of shoot.  I'm looking forward to adding more of this style to my portfolio.


White Starfish Photography

White Starfish Photography

White Starfish Photography

White Starfish Photography

White Starfish Photography

White Starfish Photography

White Starfish Photography

White Starfish Photography

Visit the website to see more Vail Newborn Photos.

Wednesday, April 12, 2017

Vail Newborn Photos - Hale

Just like life on the farm, spring seems to be a busy time for babies of the human variety to make their way into the world.  I've got two newborn sessions this week, so I figured I better post the photos from my last newborn session with sweet Baby Hale.

Newborn sessions require more time and planning than any other type of photo shoot.  To give you an idea, the amount of items that I take with me will easily fill up the trunk and backseat of my car.  They include blankets, backdrops, backdrop stands, clamps, studio lights, light stands, props, bean bags, accessories, a heater and a heating pad - not to mention my camera equipment!

Thankfully, Hale was a dream and cruised right through his session.  Out of all of the equipment, the heating pad that I use to warm up the blankets is probably the most essential in making sure that the baby will relax.  Hale definitely approved of it.

White Starfish Photography Vail Photographer Bex White

White Starfish Photography Vail Photographer Bex White

White Starfish Photography Vail Photographer Bex White

White Starfish Photography Vail Photographer Bex White

White Starfish Photography Vail Photographer Bex White

White Starfish Photography Vail Photographer Bex White

Visit the website to see more Vail Family Photos.

Monday, September 8, 2014

Minturn Family Photos - Greysen's 1st Birthday

After shooting Kimber and Phil's wedding, then the newborn photos for their baby Greysen, I was very excited to shoot Greysen's 1 year photos in Minturn recently.  Minturn is one of my favorite places in the valley.  It's a special place for our family and we take our dog Beans to run and swim there regularly.  It's a quirky, hidden gem in the valley and also one of the most beautiful backdrops for photos with it's magnificent mountainsides.

Lionshead Rock is a large rock formation, in the shape of a lion's head, that protrudes from the mountainside looking out over Minturn.  A large chunk of the rock fell and tumbled down towards the town below earlier this year.  Luckily nobody was hurt, but it did some serious damage to the train tracks that run through the town.  We started our shoot at the far end of town, and then made our way towards the damaged tracks for the last photos of the session.  If you look closely, you can see where the path that the rocks took as they tumbled down the hillside.


3 generations of very tall boys!  We weren't sure if we could get this shot because of the power lines  and their height, but it worked out.


One of the rocks that fell.  There is a much larger rock on the other side of the tracks that was too big to get in the shot.

Lionshead Rock is above and you can see the path the rocks took as they fell towards the town.


Click here to see more Vail Family Photos.


Monday, June 16, 2014

Newborn Photos in Edwards, Colorado - Nicholas

Have you ever wondered how newborn photographers are able to get babies to relax for their photos?  I usually have an arsenal of tricks up my sleeve, but every now and again, I have to get creative.  Nicholas hadn't been particularly happy when we started our photo shoot.  He loved having snuggles with his Mama, but every time we put him down for photos, he'd cry.  As many of us mothers know, babies will definitely pick up on your smell, so we figured it might be easier to bring Dad on board to help out.  Luckily, the concept worked, but he still wanted to be held.  The easy fix was to just take the photos while he was being held!  Here are a few  behind the scenes photos and the resulting photos.  As you can see, we were able to get Nicholas to relax afterwards, and we ended up getting some great shots!

Snuggling up with Dad to get relaxed shot.

The resulting photo.

Another method we tried...

and the resulting photo

Posing with his Dad's uniform


For more, go to the Vail Newborn Photos Collection.


Monday, May 5, 2014

Vail Newborn Photographer - Baby Louisa

4 years ago, I was honored to capture Eric and Sara's wedding on top of Vail Mountain, so it was extra special when I was able to capture their new baby, Louisa, recently.  This beautiful wee girl was such an angel throughout her session and we were able to incorporate some of the special outfits and blankets she's been given from family and friends.  It was also really nice for me to be able to shoot a baby girl, as most of my shoots have been for boys lately.  I'm such a sucker for cute girly props and outfits!


Vail Photo studio, Vail Newborn Photography, Vail Photographer

Vail Photo studio, Vail Newborn Photography, Vail Photographer

Vail Photo studio, Vail Newborn Photography, Vail Photographer


Vail Photo studio, Vail Newborn Photography, Vail Photographer

Vail Photo studio, Vail Newborn Photography, Vail Photographer

Click here to see more Vail Children's Photography.

Monday, April 28, 2014

Vail Children's Photographer - Parker's 6 Month Photos

Little Parker has come a long way since his newborn session last year.  This little guy has turned into one of the happiest young boys I've ever met.  We only had about 20 minutes for this quick little mini-session for his 6 month (closer to 7 month) photos and he smiled the whole time and let us change him into a few little outfits, including this bow tie and suspenders combo.  I'm looking forward to capturing some family photos with this little guy once the weather warms up around here.  Bring on the sunshine!

Vail Children's Photographer Family baby

Vail Children's Photographer Family baby

Vail Children's Photographer Family baby

To see more, visit The Vail Children's Photography Collection

Thursday, April 24, 2014

Vail Baby Photographer - Paxton's Newborn Photos

I wanted to share a few more photos of Paxton.  He was the handsome little Easter Bunny in my last blog post/tutorial.  We started our session with the bunny outfit and because that went so well, I got a little carried away and we just kept trying more and more ideas with him.  He slept through the pretty much the whole session and was possibly the easiest newborn session I've ever had.  Big brother Ty even got in on the action too.

Here are a few shots from this little supermodel.

Vail Baby Photographer, Eagle Baby Photographer, Vail Children's Photographer, Colorado Newborn Photographer

Newborn baby photos in Eagle and Vail, Colorado

Newborn baby photos in Eagle, Colorado

Vail Photographer images of newborn in Eagle Colorado

Family Photography in Eagle Colorado with 2 brothers, a toddler and a newborn

Click here for more Vail Children's Photography.

Thursday, April 17, 2014

Vail Newborn Photographer - Easter Bunny Newborn Baby Outfit Tutorial

I'm going to deviate from my usual realm of expertise today and instead, I will be writing about how to make an upcycled bunny outfit for a newborn from an old sweater.  If you were looking for a photography blog post, you can skip right to the bottom of the post to see the outcome.  If you're looking for a fast and easy way to make a cute bunny outfit for a newborn, keep reading.

To make the outfit,  you will need the following;

- An old sweater or cardigan
- A sewing machine or a great technique in hand sewing
- A good set of scissors
- Thread
- A tape measure
- Pins
- Paper glue
- Tracing paper

Let me preface this post by saying that I am not a sewer.  I come from a long line of sewing gurus and unfortunately, I don't carry the gene. In fact, I can hear my mother screaming all the way from the other side of the world as she reads this.  Needless to say, the woman has gotten me out of more sewing conundrums than anyone should ever have to put up with.  Mostly because I don't like following patterns and then I hit a wall.

 This experiment was based on 2 tutorials I found on Pinterest and another tutorial I found online by Jessica Rae.  She refers to her style as Redneck sewing and I think this tutorial definitely fits the bill.  This outfit is not designed for the rough and tumble lifestyle of a toddler.  It's just a little outfit to put on a newborn for a quick Easter photo.  I live by the theory that bad sewing and loose threads can always be photoshopped out. 

Firstly, I forgot to take a photo of the cardigan I chose before I chopped it to pieces.  Luckily, I had it in 2 colors, so I'll start with showing you the purple cardigan.  The one I hacked up was grey, but you get the general idea.


This is what then end result looks like.  I made a pair of pants with 2 hats.  I also made detachable ears and a detachable bunny tail so that the oufit can still be used year round, not just for Easter.

To start off with, I grabbed a pair of newborn pants to take measurements from.  Some of you may not have a spare pair of baby trousers, so you can use the measurements I came up with.  Again, this is not scientific and I'm not Coco Chanel.  I just needed a guideline and the measurements were
- 12 inches length in the leg
- 7 inch inseam
- 5 inch rise
- 5.5 inches wide per leg


Next I took the cardigan and measured out 12 inches on each sleeve.  This worked out perfectly and I was able to cut the sleeves right where they hit the body of the cardigan.


Which resulted in have 2 x 12 inch sleeves, ready to go.


The sleeves were slightly tapered and I wanted them a bit straighter, so I sewed a straighter line up the side that already had a seam, using a zig zag stitch.


Then I measured each arm (leg?) 5 inches down and marked it with a pin.  Once they were marked, I cut down to the pin.  Notice I cut the side that didn't have a seam.


I turned both sleeves right side out again and then placed pins around the rise.  Using a zig zag stitch, I sewed the rise together.  Make sure you turn everything right side out.  I didn't the first time around and I ended up having to do some unpicking.


Once everything is done, you should have something that resembles a small pair of pants.
Inside out

Right side out.
 I turned the pants inside out again and heated up the iron.  I folded over about an inch (as you can see from the photo on the left, it's kind of hard take a measurement because I wasn't following a pattern and everything's crooked!) and pressed and then folded them over about an another inch again and pressed them again.  Once everything was pressed, I placed pins in the waistband to guide me and I used a straight stitch to sew in the waistband.  It's hard to see, but the sewing was about an inch from the top.


Now, here's where it starts to get really redneck and my mother is going to be hanging her head in horror.  Again, it's just for photography.  It's all smoke and mirrors around here.  I wanted to put a little drawstring on the pants using Thick and Quick wool.  I had some in a nice oatmeal color that I thought would look great with the pants, but I'll be the first to tell you that I was never any good at sewing button holes.  However, after reading the aforementioned tutorials, I learned a new trick.  I cut 2 holes for the drawstrings in the waistband and then put a little Elmer's glue around the holes to stop them from fraying.


 While I was waiting for them to dry, I decided to start on the hat.  I liked the flowers on the cardigan, so I decided to make a quick hat using them.  This isn't the hat that would go with the bunny outfit, but I knew I was going to be able to get 2 hats out of the cardigan.

I measured out a hat that I already had, and it was about 8 inches wide and 5 inches tall.  Then I measured out what was left of the cardigan.

I cut out a chunk from the shoulder section  and used my hat as a guide.  
I went back to a zig zag stitch and allowed for an extra inch in sewing.
I cleaned up the edges on the hat and turned it right side out again and went back to making a drawstring for the pants.


 Using a safety pin, I pulled the Thick and Quick wool through the pants and I kept the wool quite long.  Once I had it even on both sides, I tied a bow at the length that I liked and tied the ends to keep them from fraying.


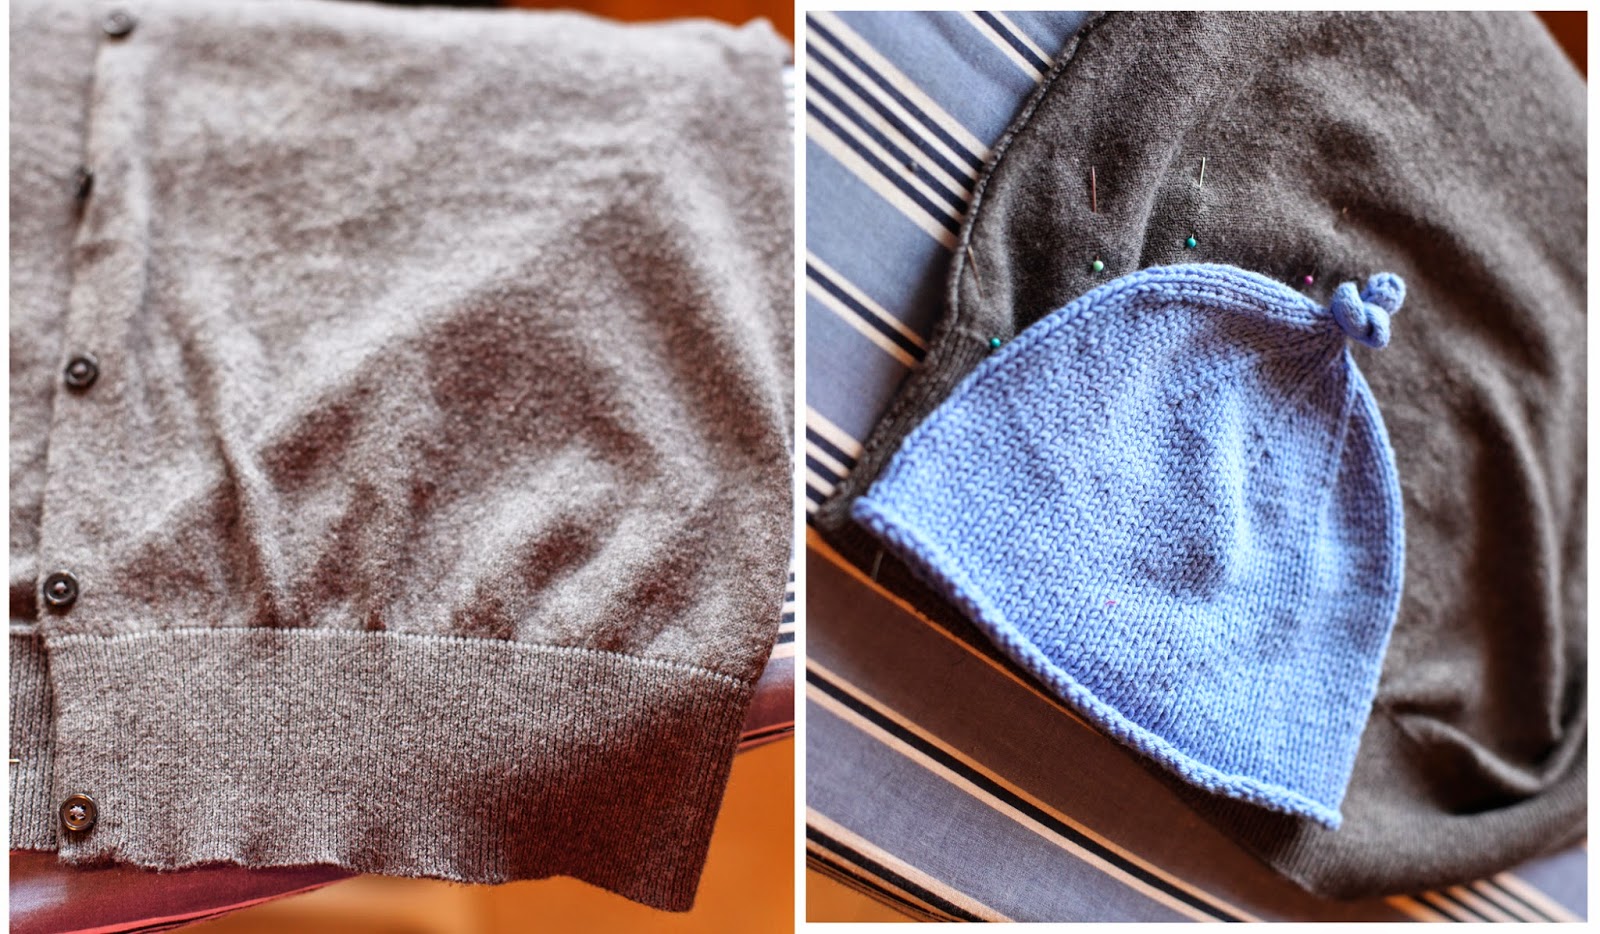
 So at this point, I had this.  I knew I wanted to make another hat with detachable bunny ears, so I pulled out the blue hat again.


Taking a piece from the bottom of the cardigan, I put the hat on the bottom of the cardigan and started pinning around it for a guide.  This way I could also take advantage of the stretchy seam that was already in place at the bottom of the cardigan.


Using my pins as a guide again, I sewed and arch shape using a zig zag stitch again.


I cleaned up the edges with my scissors and gave it a test run on my son's teddy.  So far, so good.  I cut another piece out of the cardigan to start on the ears.


I drew some ears out on non stick baking paper.  In all honesty, I didn't leave enough room for sewing.  I would recommend having enough room to cut at least half and inch around the ears to allow for sewing.  Once they were cut out, I used pins to hold them together and I used a zig zag stich again.  I allowed about a 1 inch gap in the bottom to turn them right side out again.


Using a knitting needle, I was able to push the ends out and give the ears more shape.  I ironed them flat and then thought I would use the wool to embroider little stitches around the ears.


That I idea was quickly squashed, once I realized I couldn't pull the needle through the ears because it was too thick.  I tried to pull the wool apart, thinking it would result in wool at half the width and just as much strength.  Unfortunately, it gave it more of a candy floss consistency, which gave me another idea.


I pulled the wool to pieces, and the more I kept pulling at the wool, the more it became like cotton wool.  I added glue to the ears and voila, the wool would now become bunny ear fluff.


 Using the same technique, I pulled some more wool apart and to make a bunny tail for the pants.


The ears and the bunny tail were all added to the outfit using safety pins.  This way I can still use the hat and the pants year round.

Keep in mind when you're reading this that I was also taking care of a 9 month old baby and a dog during a huge blizzard this same day, hence the graham cracker crumbs everywhere!  

The result of all of this crafty fun was this photo of little Paxton during his newborn shoot a few days later.  Here he is in all his bunny glory!


Mum, if you're still reading this, thanks for getting me out of all of the sewing messes I've caused over the years.  Apparently 2 years of Home Economics at Waikato Diocesan School for Girls wasn't enough.  I may not know how to sew, but I can take a fairly decent photo!  xxoo